Introduction
Integrating Cisco switches and routers with Microsoft Active Directory (AD) can streamline network management, enhance security, and centralize user authentication. This comprehensive guide will walk you through the necessary steps to achieve this integration effectively.
Why Integrate Cisco Devices with Active Directory?
Centralized Authentication: Active Directory allows for centralized authentication, meaning you can manage all user credentials in one place. This simplifies user management and enhances security by ensuring consistent authentication policies across your network.
Enhanced Security: Using AD for authentication ensures that only authorized users can access network devices. This reduces the risk of unauthorized access and allows for better auditing and compliance tracking.
Simplified User Management: By integrating with AD, you can leverage existing user accounts and groups, eliminating the need to create and manage separate credentials for network devices.
Prerequisites
Before starting, ensure you have the following:
Cisco Switches/Routers: Ensure they are compatible with RADIUS or TACACS+.
Microsoft Active Directory: Properly configured and operational.
NPS (Network Policy Server): Installed and configured on a Windows Server.
Basic Knowledge of Cisco CLI and AD: Familiarity with command-line operations on Cisco devices and AD management.
Step-by-Step Guide
Step 1: Configure NPS as a RADIUS Server
1. Install Network Policy Server (NPS):
-Open Server Manager, go to Add roles and features, and select Network Policy and Access Services.
2. Register NPS in Active Directory:
-Open the NPS console.
-Right-click NPS (Local), and select Register server in Active Directory.
3. Configure a RADIUS Client:
-In the NPS console, expand RADIUS Clients and Servers.
-Right-click RADIUS Clients and select New.
-Enter the Friendly name and IP address of the Cisco device.
-Configure a Shared Secret (a password that will be shared between the Cisco device and the NPS server).
4. Create a Network Policy:
-In the NPS console, expand Policies and select Network Policies.
-Right-click Network Policies and select New.
-Define the policy name and conditions (such as user group membership).
-Configure the authentication methods (e.g., MS-CHAPv2).
Step 2: Configure Cisco Switch/Router
1. Access the Cisco CLI:
-Connect to your Cisco device using SSH or console.
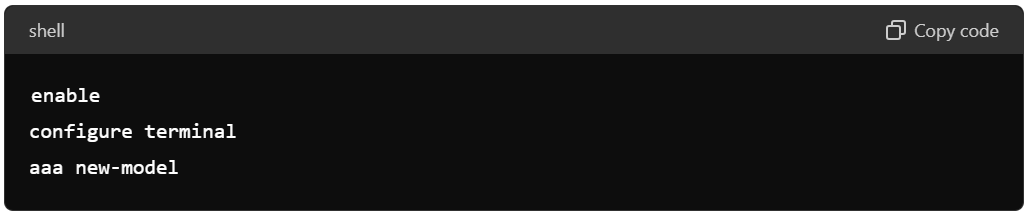
2. Enable AAA:
3. Configure RADIUS Server:

4. Configure AAA Authentication:

5. Test the Configuration:
-Save the configuration and test by logging in with an AD user account.
Step 3: Verify and Troubleshoot
1. Verify Connectivity:
-Ensure the Cisco device can communicate with the NPS server.
-Use ping and traceroute commands to verify connectivity.
2. Check Logs:
-On the NPS server, check the logs for any authentication attempts and errors.
-On the Cisco device, use the show logging command to review logs for any issues.
3. Test with Multiple Users:
-Ensure users in different AD groups can authenticate and receive appropriate access levels.
Best Practices
- Regularly Update Shared Secrets: Change shared secrets periodically to enhance security.
- Monitor Logs: Regularly monitor logs on both the NPS server and Cisco devices to detect any unusual activity.
- Backup Configurations: Always backup your Cisco configurations before making changes.
Conclusion
Integrating Cisco switches and routers with Microsoft Active Directory can significantly enhance your network's security and simplify user management. By following this comprehensive guide, you can ensure a seamless and secure integration, leveraging the strengths of both Cisco's robust network hardware and Microsoft's versatile directory services. With proper configuration and monitoring, this integration will provide a centralized, secure, and efficient authentication mechanism for your network infrastructure.

Category: Cisco switches